Meal Planning (The 5 Stars of Cafe Le Shay)

IMG_20180114_164153

It is no secret that I love to cook. I have thousands of recipes saved to try, a not small collection of cookbooks, and my favorite gifts are more kitchen supplies. However, after a long day at work, I just can’t seem to find the energy to do more than pick up fast food or eat only chips and salsa. I’m somehow terrible at meal planning. It’s not the process that messes me up.  I make plans and shop with the best of them. But when it comes to the actual cooking, I have no energy, even if it was something that I was excited to make.

You might say “Well, get on the meal prep trend, Shay!” The one where someone spends hours on the weekend making breakfast, lunch, and dinner for the week. And if I wasn’t trying to cram everything else into my weekend, that might be a good idea.

My husband, Andrew, came up with this idea of the “5 Stars”. He gets home at least an hour before I do, and he said, “I can cook.  Let’s plan some simple meals and then I can have dinner ready for you when you get home.” (Isn’t he the best?)

The 5 Stars are basically theme nights. Initially, we are using:

  • Taco Night
  • Sandwich Night
  • Appetizer/Snack Night
  • Sheet Pan/One Pot Night
  • Stir Fry Night

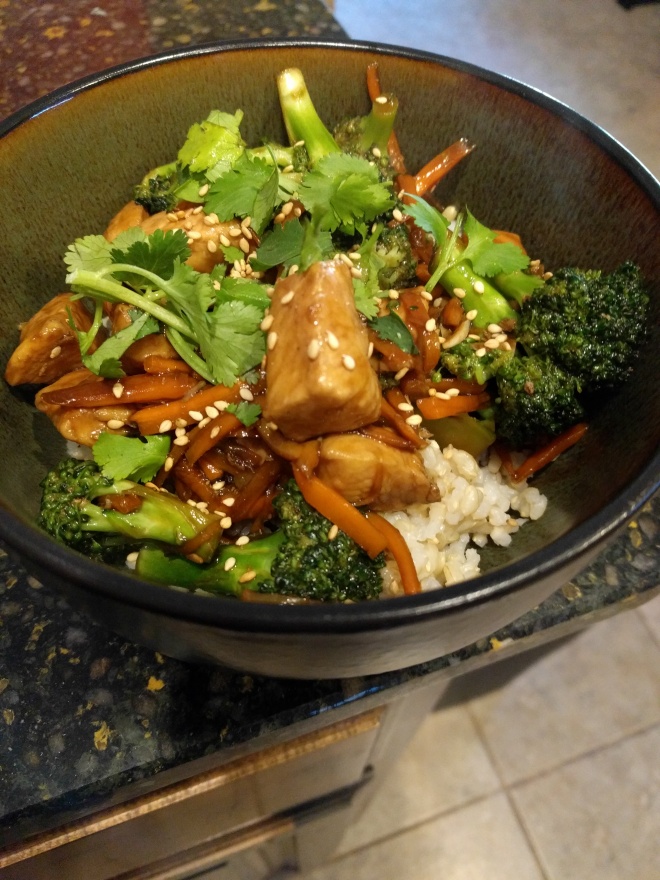
The idea is that they are specific enough to stick to, but flexible and simple enough to not get bored. They don’t align to specific days. We pick what flavors we want, shop for that on the weekend, and then make whichever one we feel like each night. We tried to pick things that don’t typically take more than 30 minutes to an hour to cook.  This also allows me to try new recipes on the weekend when I’ll have plenty of time. The picture at the top is the results of one of the Stir-Fry Nights.

After a couple of months, we’ll evaluate and maybe trade some out for other different themes. We are not applying this to breakfast or lunch. We typically take leftovers for lunch, and breakfast depends on what we have around the house.

Do any of you use something similar to the 5 Stars?  What are your favorite theme nights? Or, if you don’t use theme nights, what is your plan for dinner? How do you manage low energy days?

2013 CSA Week 6

dsc01526

One thing about getting this much fresh food straight from the farm is that it doesn’t last as long as under-ripe supermarket produce.  It’s been a challenge to eat through it all.

This week’s haul:

  • Snow peas
  • Cabbage (again!  I’m running out of ideas!)
  • 2 little cucumbers
  • Tomatoes
  • Strawberries
  • Beets
  • Green onions
  • Asparagus
  • Eggs
  • Lettuce

I see lots of salads in my future because we still have so much lettuce!

2013 CSA Week 5

dsc01522

Sorry for the week off guys.  I live in Oklahoma, so we’ve had a lot of tornadoes lately, and while the posts I had in the queue went up, I’ve run out of buffer.  I’m going to rebuild it today, as well as put up a post in the next couple days for people who want to help.  My place wasn’t hit, but the town just north of me was hit really bad (you may have seen Moore, OK on the news lately).

Our farmer was thankfully not hit either, so this week we have:

  • Eggs
  • Beets
  • Snow peas
  • Two small cucumbers
  • Green onions
  • Another (!) head of cabbage
  • Bunch of asparagus
  • A bag of lettuce
  • A bunch of strawberries (nice and fresh this time!)

We’re still working through the stashes we’ve got, so hopefully I’ll also have new recipes to post as we try to think of creative ways to use up the vegetables.  This is probably one of the healthiest moves we’ve ever made.

2013 CSA Week 4

dsc01521

Week 4.  We are not quite getting through things fast enough, and this basket is huge for us!  Expect lots of new recipe posts as we try to use this.

  • Eggs
  • A whole green cabbage
  • Whole beets
  • Tomatoes
  • Broccoli
  • Sugar snap peas?
  • Strawberries (these ended up being too far gone, even by the time we got them.  Could have been the bad weather lately, or when the farmer picked them.  We’re not sure.)
  • Green onions
  • Asparagus
  • A head of lettuce

2013 CSA Week 3

dsc01518

We’re still working through our previous baskets, but as of tonight, we’re almost caught up.  I’ll be having a post up soon about how I used up a bunch of the veggies all at once.

This week we have:

  • Swiss Chard
  • Green Kale
  • A head of lettuce (not sure what type, romaine, maybe?)
  • Eggs
  • Radishes
  • Asparagus
  • Green Onions
  • Strawberries (huzzah!)

2013 CSA Week 2

Ok, so there was a lot of food in that basket.  We’re still eating through it all.  The hardest thing to get through are the greens, because while we like salads, we rarely make a whole meal of them.  We have fewer leftovers to work through in the fridge, so we’ll hopefully be getting through this haul a bit better.
dsc01514

This week:

  • Tomatoes
  • Asparagus
  • Radishes
  • Tiny beets!
  • Eggs
  • Baby green onions
  • Swiss chard
  • Lettuce
  • Green Kale

The challenge this week is again the greens.  I’m seeing lots of salads, and maybe a risotto in my future.

2013 CSA Week 1

This year, Andrew and I signed up for a CSA (Community Supported Agriculture).  Basically, we pay a farmer for a season, and in return, we get a basket of some of their crop.  CSAs are great if you’re into local or real food, and can’t manage a large garden of your own.  This is our first time doing this, and we really like our farmers.  They don’t use any pesticides on their crop and also offer milk and various meats that we hope to try later in the season.  For those who haven’t tried a CSA before, I’ll be posting photos of our haul each week.

Some notes:  We signed up for the “small” share, which is supposed to feed 1-2 people.  A CSA may seem expensive for the price, but as you’ll see, you can get a lot of food.  I doubt Andrew and I will have to buy very much produce while we’re doing this.  Also, our farmer has greenhouses, so they are able to offer us things like tomatoes in early May after the weather here has been awful for tomatoes.

dsc01513

In this week’s basket:

  • Swiss Chard
  • Strawberries
  • Green Onions
  • Lettuce
  • Leeks
  • Eggs
  • Radishes
  • Tomatoes
  • Asparagus

And just think, we’ll be getting another basket next week!  I’m excited to come up with ways to eat this delicious haul.

Recipe du Jour: Homemade Pumpkin Puree

Just a quick sidenote to announce the creation of two more pages: The Recipe Index and the How-To Index. Of course, you can still use the tags or the search function to find things like this, but if you’d like to see a big list of everything without scrolling through the posts, these are the way to do it.

—————————

As part of my real food project, I try to eat as seasonally as I can. I avoid strawberries in December, and apples in the spring. While we do live in a world with a global economy that allows us to have foods from all over the map at any given moment, this isn’t the way food was meant to be consumed. Also, most of the time, in order to look nice when it gets to you, the produce has been picked before it’s ripe. Varieties have been bred in order to survive the long abusive shipping time, not necessarily to taste good. So if you want the best taste out of your food (and want to save a little coin), it’s best to eat in season, when the plants would have given it to you.

This makes each season a special treat for me, and one of the things I love about fall and winter is that I get to use pumpkin. I love pumpkin, and I love baking with it. Now, the canned stuff is ok, but if you’re going to cook with pumpkin, why not go all out? Make your own homemade pumpkin puree.

Ingredients:

  • 1 pie pumpkin

You need a pie pumpkin because jack-o-lantern pumpkins are too tough and have very thin flesh. Not good for eating.

Directions:

Preheat your oven to 400 degrees F. Cut the pumpkin in half, like you would a hamburger bun, with the stem on top of one piece. Clean out the seeds and strings. It doesn’t have to be perfect. Put a piece of parchment paper down on a cookie sheet. Place the pumpkin halves on the parchment paper, cut side down. Toss in the oven for about an hour, until you can tell the pumpkin is soft, either by appearance, or inserting a knife or fork. Pull out of the oven, let cool. Once you can handle the pumpkin, scoop out the flesh, into a blender or food processor. It should be very soft and you should be able to just scrape it off the inside of the skin. Puree until smooth. Store in an airtight container.

Notes:

In the fridge, this might last a week, depending on how wet your pumpkin is. In the freezer, it lasts a long time. I don’t know when it goes bad because I’ve always used it up before then. If you notice a liquid from your puree, just drain it off. It’s a side effect of the pumpkin cooking, and you don’t want it if you want your puree to behave like the canned stuff. Use in equal portions as you would canned pumpkin.

Also, I have heard of methods of boiling pumpkin, but that involved peeling it, cutting it small, and the end product was way too watery. I like the roasting method because it gives me a nice caramelized flavor, a not so wet puree, and it’s easier.

Canning Broth: Easier than previously thought

6832048268_3c29ea55c4_oSo, back near Thanksgiving, I made some turkey broth.  At the time, I measured it out, put it in freezer bags, and froze it.  This has been the way that I’ve done my broth for a while now.  However, I can never get the bags to freeze flat and therefore they take up a lot of space in my freezer.  (What I would give for the space to have a chest freezer!)  A friend came into a pile of beef (her dad had bought half a cow) and she wanted to share.  So we needed to make room in the freezer.

Last summer, when we canned the cherries, I bought a bunch of jars and a pressure canner.  Now, a brief primer on canning.  Most canning can be done in a boiling water bath, with pots you already own, as long as they cover the top of the jars.  This is for things like jams, jellies, and tomatoes.  These foods have enough sugar or acid (or both) that they can be canned with boiling water.  Other foods, such as soups or pasta sauces, don’t have these properties, and so need a much higher heat in order to be safe.  This higher heat can only be acquired at home with a pressure canner.  For more specific info, I recommend checking out a basic canning book, like The Ball Blue Book.  This was the book that I started with.

Ever since I learned about home canning, I’ve dreamt about canning my own soups.  The idea of pulling a jar off the shelf and dumping it in a pot, easy as store-bought soup, but so much healthier!  I’ve since learned that dream is a little unrealistic; most soups can’t be canned in their finished form with everything already mixed together.  But broth can be, and that’s about halfway there.

I’m pleased to say that this experiment was successful.  You basically wash the jars, heat the broth, fill the jars, seal, put in the canner and process for as long as the directions say.  Much more straightforward than making jam or preserves.  In fact, I’m going to make some ham broth later this week and can that too!  I’m also looking forward to canning my grandma’s chicken soup (which is basically carrots, onions, celery and chicken broth).

Recipe Du Jour: Black Bean Soup

6903389797_9f9a7d38af_oSo as part of my real food lessons from GNOWFGLINS, I recently learned to soak and cook dry beans.  Most of the time when a recipe called for beans, I used canned beans.  They were convenient, but I’ve known for a while that cooking from dry beans is healthier (fewer preservatives, and reduces gas) and cheaper.  I think I overcooked them a little because I used a slow-cooker for the actual cooking, but that’s something to experiment with.  (Also, if you want to try this, make sure not to use a slow-cooker on kidney beans.  They have a toxin that needs to be boiled out, so only cook them in a stock pot or pressure cooker.)

In any case, I cooked a whole pound of dry black beans, and I needed something to use them in.  What better than my black bean soup?  It also gives me a chance to test out my new immersion blender.

Ingredients:

  • 2 (14.5 oz) cans black beans (or equivalent amount cooked)
  • 1 (8 oz) can Spanish style tomato sauce
  • 1/2 onion, chopped
  • 2 cloves garlic, minced
  • 1 tsp gr. cumin
  • 3 cups chicken (or veggie) broth

Directions:

Heat all ingredients together in a pot.  When hot, use immersion blender to halfway puree the soup.  Don’t puree completely; you want to be able to see some whole beans still.  (If you don’t have an immersion blender, ladle about half the soup into a blender.  Blend, and then add back to the pot.  Be careful when pureeing hot liquids!)  Serve with a nice crusty bread, my favorite is sourdough.

Notes: 

This soup is something that would be great in a bread bowl.  It comes together really quickly and makes for an easy weeknight meal.  Watch out though, it can be a bit spicy.  The image above I was testing my new blender, and so I pureed the soup a bit too much.  The completely pureed soup is best as a dip and definitely needs bread.  Personally, the texture is better with some whole beans still left.